How to send and receive email alerts and invitations?
Email Alerts and Invitations (Microsoft Outlook, Exchange, Google Calendar and iCal)
Event sharing with other calendars can be done via email alerts and invitations, direct Outlook injection, or calendar subscriptions. This topic will cover the email alerts and invitation method. For more details on direct Outlook injection see this FAQ page, and calendar subscriptions see this FAQ page.
Overview

Schedule it allows email alerts to be sent with any new event or event changes and these include iCalendar and vcalendar information. This allows remote users to receive, view and interact with events in a number of other calendar systems and software. The calendar information allows appointments to be imported and updated in Microsoft Outlook® on Windows and Apple, Apple iCal®, Google Calendar® and many other remote or online calendar systems which support the ICS format. Schedule it can also receive remote requests from users of these calendar systems and can add new events based on the invitation details received.
A remote user can manually open the ICS attachment or the appointment can be automatically added, updated or deleted in the remote calendar if the users system supports this option or you can use our Outlook macro to automate these actions. Users can also accept or decline the appointment if its sent as an invitation. When the response is received by Schedule it the local event can be updated to reflect the users response.
For your security, and to prevent the processing of spam and malicious emails, an approved list of email addresses is created automatically when Schedule it sends email alerts. Replies are then only processed from the email addresses in your approved list. Sending an email to an email address will automatically add it to your approved list if its not already present. From the menu Tools/Emails you can remove unused addresses from your approved list to give space for new ones.
For any alerts to be created the selected options will need to be activated in menu 'Tools/Options/Emails/Alerts & Reminders' and a valid email address is required.
Event Emails : If an event has an email address in the email address box then any changes to the event will create a 'Event email' alert to that address. You will also be prompted to send to any resources linked.
Resource Emails : In a resource you can enter an email address. Any additions or changes to any event that is planned in the resource will create a 'Resource alert' email to the resources email address.
User Emails : In a users account details you can enter an email address, and also select which resources the user should be notified about. Any additions or changes to any event that is planned in any of the selected resources will create a 'User alert' email to the users email address.
Manual Emails : In the event window there is an email button which will manually cause all of the options to be checked and any emails sent. Any contacts linked to the event will also receive an email.
All emails are queued in list ready to be sent by a chosen PC specified in the options by either SMTP in Outlook/Exchange or remote SMTP email account.
Setup for Sending Appointments
Step 1: Add an email address to your resources so they can receive alerts by email.
Step 2: From the menu 'Tools/Options/Email/Email Servers' setup the SMTP email server settings so Schedule it can send emails. Also set the automatic send time or you can send manually from the Tools menu.
Step 3: From the menu 'Tools/Options/Emails/Email Alerts' tick the option to 'Enable Resource Alerts'.
Done: Adding an event to a resource with an email address will now create an email alert which will be added to the email queue (menu 'Tools/Emails'). Once the email is sent to the remote user they can add the appointment to the calendar of their choice, and their email address is approved to allow them to respond.
Setup for Receiving Appointments and Invitation Replies
Step 1: From the menu 'Tools/Options/Email/Email Servers' setup the POP email server settings so Schedule it can receive emails.
Step 2: Check the 'From email address' in the SMTP settings matches the POP account you are checking as this is where remote users send their replies.
Step 3: From the menu 'Tools/Options/Email/Email Receiving' tick the option to 'Allow invitation replies to be received'.
Step 4: If you also want to receive invitations by email, from the menu 'Tools/Options/Email/Email Receiving' tick the option to 'Allow new remote invitations to be received'.
Step 5: The word 'Accepted :' or 'Declined :' is checked in the email subject if the email is encrypted or does not contain valid ICS information. If your replies have different wording you can change the words or added multiple words separated by a comma, e.g. 'Accepted :,Acceptée'
Done: When emails are received automatically, or manually from the menu 'Tools/Emails', any replies will be imported and the local events updated.
The email invitation replies are examined to determine the remote users response. If the email message does not contain any valid iCalendar information, or the email is encrypted, then the subject is read to determine the action required.
Outlook can encrypt new 'internal' invitations sent to 'internal' users which prevents Schedule it and other applications from reading them. Using an external POP3 server, or different email address domain, can force Outlook to send invitations in a more readable format which allows them to be read.
Outlook Sample:
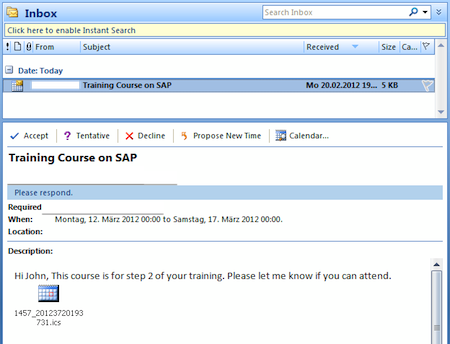
The image below shows the Inbox on Outlook 2010 with the Schedule it event email highlighted. In the email preview pane the Accept and Delcine buttons are instantly available to respond. Once the event is accepted or declined the email is automatically deleted and the calendar appointment added, updated or deleted. Similar options are also visible on other versions of Outlook, Google Calendar and Apple iCal.
Notes:
We strongly recommend using a dedicated account for your Schedule it email so only know emails will be sent and received. There are many free email providers and you can use any that support POP access.
Note: Each single Schedule it desktop license can support an approved email list of 3 addresses. Additional licenses can be purchased to support a higher number of approved addresses and remote calendars. E.g. 10 desktop licenses can support 10 Schedule it users and 30 remote users via email. Bulk license packs are available which give unlimited sharing and removes the 3:1 limitations.
Time zone adjustments for iCalendar attachments
The standard event ICS attachment has no time zone information so events will be imported by remote users using the exact date and time of the event no matter their global location. If you are sending events to users in different time zones you can edit the template used to create the ICS attachment file and include your time zone information. When remote users then open/import the ICS file the date and time will be adjust to their personal time zone.
You can edit the template from the menu Tools/Options/Templates and choose the template 'Event - ICS Attachment'. You can also edit directly with Notepad from the templates folder in 'My Documents/Schedule it 7/templates/template_email_ics.txt'. The example below shows how to add events where the default time zone is 'Eastern Standard Time'.
The information below should be inserted just after the line 'VERSION:2.0'.
BEGIN:VTIMEZONE
TZID:Eastern Standard Time
BEGIN:STANDARD
DTSTART:20071104T020000
RRULE:FREQ=YEARLY; BYDAY=1SU;BYMONTH=11
TZOFFSETTO:-0500
TZOFFSETFROM:-0400
END:STANDARD
BEGIN:DAYLIGHT
DTSTART:20070311T020000
RRULE:FREQ=YEARLY; BYDAY=2SU;BYMONTH=3
TZOFFSETTO:-0400
TZOFFSETFROM:-0500
END:DAYLIGHT
END:VTIMEZONE
You also then need to insert the time zone name into your date start and date end lines.
Before...
DTSTART:2013...
DTEND:21013...
After...
DTSTART;TZID=Eastern Standard Time:2013...
DTEND;TZID=Eastern Standard Time:2013...
The date and time will now auto adjust for your remote users to fit their time zone using 'Central Standard Time' as the reference zone.
The example below shows the default time zone for western Europe/London:
BEGIN:VTIMEZONE
TZID:Western European
BEGIN:STANDARD
DTSTART:20001029T030000
RRULE:FREQ=YEARLY; INTERVAL=1; BYDAY=-1SU;BYMONTH=10;BYHOUR=3
TZOFFSETFROM:+0100
TZOFFSETTO:+0000
TZNAME:Standard Time
END:STANDARD
BEGIN:DAYLIGHT
DTSTART:20000326T020000
RRULE:FREQ=YEARLY; INTERVAL=1; BYDAY=-1SU;BYMONTH=3;BYHOUR=2
TZOFFSETFROM:+0000
TZOFFSETTO:+0100
TZNAME:Daylight Savings Time
END:DAYLIGHT
END:VTIMEZONE
....
DTSTART;TZID="Western European":2013...
DTEND;TZID="Western European":2013...
(UTC, GMT, email, timezone, setup, set up, smtp, pop3, server)
Last updated, 5 April 2024, 10:53
Still need help? Contact Us
Join Us - Live Webinar
...
Help Topics
Contact Us